Colour Filters for B&W Photography
Why Use Colour Filters for Black & White Photography?
Black and white film doesn’t see colour. It sees brightness. A red barn and a green tree that look completely different in person can end up as the exact same shade of grey on the negative. The result is a flat, lifeless image where distinct elements merge together.
Colour filters fix this. By placing a coloured filter in front of the lens, you control how each colour in the scene translates into grey. You can darken a blue sky to make clouds pop, brighten green foliage so it doesn’t look like dark mud, or lighten skin tones for smoother portraits. The filter gives you creative control over contrast that simply doesn’t exist without one.
If you’re new to the visible spectrum, the slider below shows you what each wavelength of light looks like:
Everything from roughly 380nm (violet) to 700nm (deep red) is visible light. Every colour filter either passes or blocks specific parts of this spectrum, and that’s what creates its effect on black and white film.
How Colour Filters Work
The rule is simple: a filter lightens its own colour and darkens the opposite colour.
A red filter passes red light freely and blocks blue and green. On B&W film, red objects appear lighter and blue skies go dark. A green filter does the opposite: it passes green and blocks red, so foliage brightens while warm tones darken.
This happens because the filter is physically preventing certain wavelengths from reaching the film. Less light from blue sky = darker sky on the negative. More light from green leaves = brighter leaves on the negative. The film doesn’t know why some areas got more light than others. It just records the result.
Select a filter below to see how it changes the way each colour renders as grey:
These are the original colours as they appear in the scene.
For the physics of how this works at the spectral level, see our guide to understanding spectral transmission curves.
Yellow Filters: The Starting Point
The Yellow 8 (also called K2) is the most classic filter in B&W photography. Many film photographers leave one on the lens permanently because its effect is so universally beneficial: it slightly darkens the blue sky, brings out clouds that would otherwise disappear, and restores the tonal balance that panchromatic film tends to lose.
The cost is about 1 stop of extra exposure, barely noticeable.
If you do nothing else with filters, a Yellow 8 will improve nearly every outdoor B&W photograph you take. It’s not dramatic. It’s just right.
Click or tap anywhere on the image to move the split and compare different areas of the scene.
The sky has shifted from a washed-out pale grey to a natural mid-tone, and the clouds now show separation. It’s a subtle correction, not a dramatic transformation. That’s the whole point.
Best for: Landscapes, street photography, general outdoor B&W work.
For the full breakdown of yellow filter variants (Yellow 6, 8, 11, 12, and 15), read our yellow filters guide.
Orange Filters: The Sweet Spot
If yellow is correction and red is drama, orange is the middle ground. The Yellow-Orange 16 (Wratten 16) is one of the most popular contrast filters for B&W film because it delivers a visible, punchy effect that still looks natural.
It darkens skies more aggressively than yellow, cuts through atmospheric haze, and gently smooths skin tones in portraits. At about 2 stops of exposure cost, it’s still practical for handheld shooting.
Click or tap anywhere on the image to move the split and compare different areas of the scene.
Compare this to the Yellow 8 above. The sky is noticeably darker, the clouds have more punch, and the haze on the distant peaks has started to clear. Many landscape photographers consider this the best all-round B&W contrast filter.
Best for: Landscapes with haze, portraits in natural light, architecture against blue sky.
For the full breakdown of orange filter variants (Yellow-Orange 16, Orange 21, and Deep Orange 22), read our orange filters guide.
Red Filters: Maximum Drama
The Red 25 is the filter that turns good landscapes into dramatic ones. It blocks almost all blue and green light, rendering blue skies as near-black while white clouds blaze with extreme contrast. Even a calm sunny afternoon can look like a thunderstorm is rolling in.
Ansel Adams famously used a deep red filter for his iconic “Monolith, the Face of Half Dome” in Yosemite. If you’ve ever wondered how he got those pitch-dark skies, this is a big part of the answer.
The cost is about 3 stops of exposure, which is significant. Red filters are for situations where you specifically want drama, not for everyday use.
Click or tap anywhere on the image to move the split and compare different areas of the scene.
The sky has gone from grey to near-black. The clouds blaze white. The forested slopes have darkened, and the distant peaks cut through the haze with sharp definition. This is the Red 25 doing what it does best.
Best for: Dramatic landscapes, architecture, haze penetration, high-contrast creative work.
For the full breakdown of red filter variants (Red 24, 25, 26, and Deep Red 29), read our red filters guide.
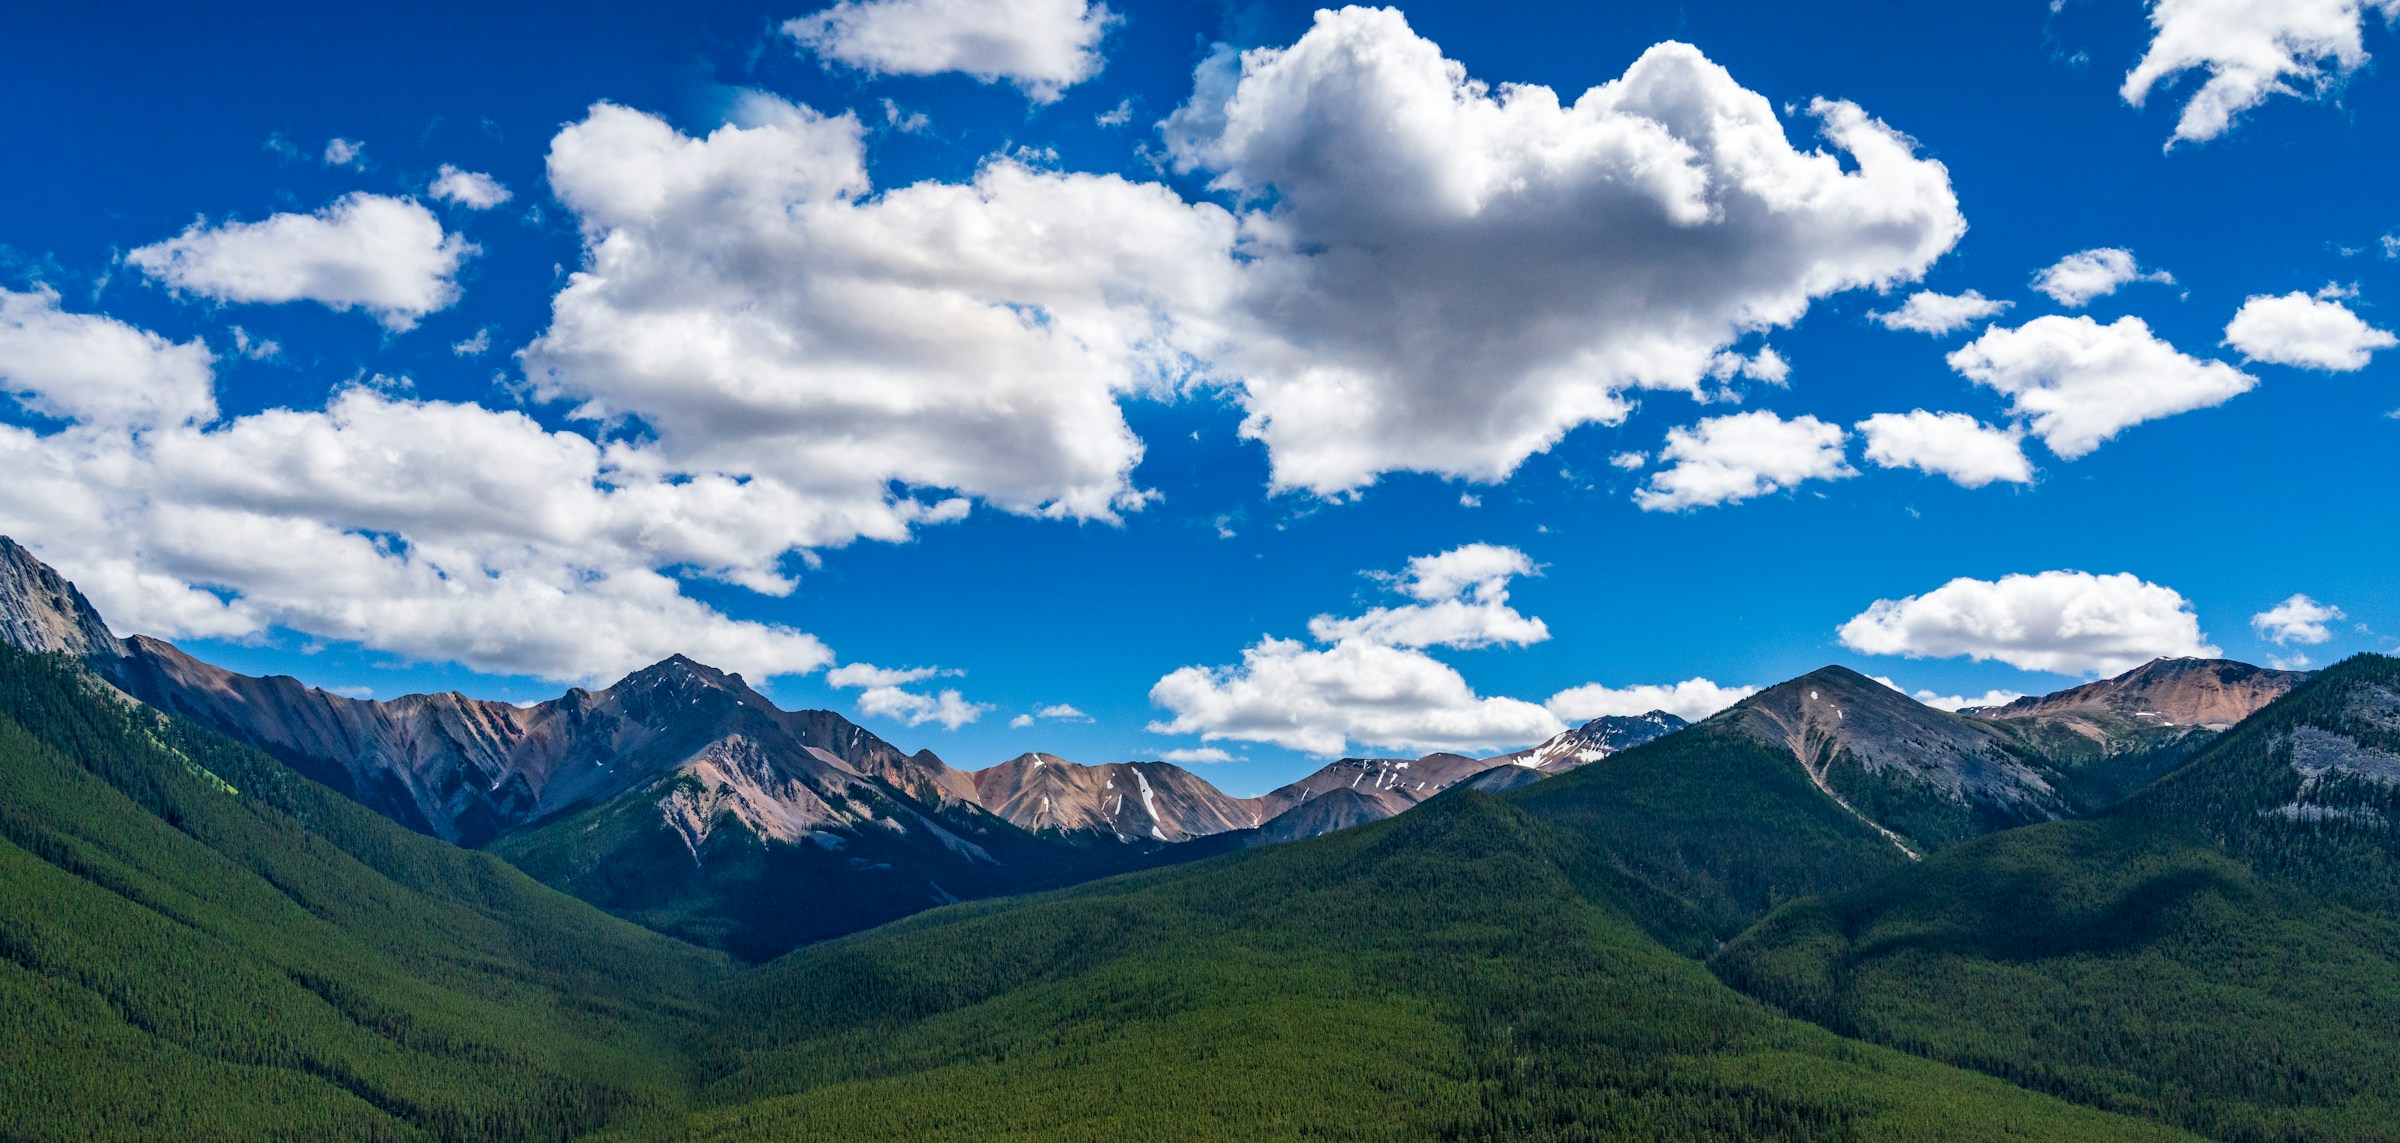
Green Filters: The Foliage Specialist
Green filters are the opposite of red. Where a Red 25 darkens foliage and lightens warm tones, a Green 58 brightens foliage and darkens reds. This is invaluable in scenes with lots of vegetation, where unfiltered B&W would render different greens as the same dark muddy tone.
With a green filter, leaves brighten and separate, grass gains texture, and woodland scenes come alive with tonal variation. Red and orange elements (autumn leaves, flowers, warm stone) go darker, creating a natural contrast that works beautifully for botanical and nature photography.
At about 2 stops of exposure cost, green filters are in the same range as orange.
Click or tap anywhere on the image to move the split and compare different areas of the scene.
Notice how the forested slopes have brightened compared to the other filters. The green filter is doing exactly what it should: lifting the foliage tones while the sky and warm elements darken.
Best for: Botanical photography, parks and woodland, scenes with mixed foliage, portraits where you want to emphasise skin texture.
For the full breakdown of green filter variants (Green Tricolor 58 and Green 99), read our green filters guide.
Comparing the Filter Families
The chart below shows all four filter families overlaid. You can see how each one passes different parts of the spectrum while blocking others:
Based on spectral data and a generalised sensor model. Results approximate real-world behaviour.
The Yellow 8 trims the blue end gently. The Orange 16 cuts deeper. The Red 25 blocks everything below 600nm. The Green 58 takes a completely different approach, passing green while blocking the warm and cool extremes.
Want to see how each one transforms a real photograph? Try them all in our filter simulator. Upload your own photos or use the image library to compare any filter on the same scene.
Which Filter Should You Buy First?
If you shoot B&W film outdoors, your first filter should be a Yellow 8 or a Yellow-Orange 16. Both are versatile enough to leave on the lens most of the time, and they fix the single biggest problem in B&W photography: pale, lifeless skies.
If your work is primarily landscapes and you want punchy results, go straight to the Orange 16. It’s the best balance of effect versus exposure cost.
If you want drama and creative impact, a Red 25 is the classic choice. It’s not an everyday filter, but when the scene calls for it, nothing else comes close.
If you photograph plants, gardens, or woodland regularly, add a Green 58 to your kit. No other filter handles foliage as well.
Not sure which is right for your style? Upload your own photos to our filter simulator and try every filter on images you actually shoot. It’s the fastest way to build intuition before committing to a purchase.
Exposure Compensation at a Glance
All colour filters block some light. If your camera meters through the lens (TTL), it compensates automatically. If you use a handheld meter, you need to add the extra stops yourself.
Use the calculator below to see filter factors for each family:
Based on spectral data and a generalised sensor model. Results approximate real-world behaviour.
As a rule of thumb: yellow costs the least (~1 stop), orange and green are moderate (~2 stops), and red costs the most (~3 stops). The heavier the effect, the more light the filter blocks.
Understanding the Science
Every filter’s behaviour is defined by its spectral transmission curve, a graph showing exactly how much light passes at each wavelength. Once you can read these curves, no filter is a mystery. You’ll know precisely what it does, why it does it, and whether it’s the right tool for the shot.
If you want to go deeper into optical density, filter stacking maths, and how to read manufacturer datasheets, see our full guide to understanding spectral transmission curves.
Tips for Getting Started
Start with one filter. Learn what it does to different subjects before adding more. A Yellow 8 or Orange 16 teaches you the fundamentals of contrast control without overwhelming you.
Bracket your exposures when you first try a new filter. Shoot one frame at the metered exposure, one a stop over, and one a stop under. Film is cheaper than a missed shot.
Use our simulator first. Upload your own photos to the filter simulator and compare filters side-by-side. It’s the fastest way to understand what each filter does to your specific subjects.
Learn the spectrum. Understanding which colours a filter passes and blocks makes every decision intuitive. Our guide to spectral transmission curves covers this in depth.
Build your kit gradually. Most B&W photographers carry two or three filters. A Yellow 8 for everyday use, a Red 25 for drama, and a Green 58 for nature covers nearly every situation.
What’s Next?
Dive into the individual filter guides for detailed breakdowns, interactive simulator demos, and practical advice:
- Yellow Filters for Black & White Photography
- Orange Filters for Black & White Photography
- Red Filters for Black & White Photography
- Green Filters for Black & White Photography
- Understanding Spectral Transmission Curves
Or head straight to the filter simulator and start experimenting with your own photos.
Frequently Asked Questions
What colour filters are used in black and white photography?
The four main filter families are yellow, orange, red, and green. Yellow provides subtle correction, orange gives moderate contrast, red creates dramatic effects, and green specialises in foliage. Each blocks different parts of the visible spectrum, changing how colours translate into shades of grey.
How do colour filters work in black and white photography?
A colour filter passes light of its own colour and blocks the opposite (complementary) colour. On B&W film, this means objects matching the filter colour appear lighter in the print, while objects of the opposite colour appear darker. This selective blocking is what creates contrast between elements that would otherwise look the same shade of grey.
Which filter is best for black and white landscape photography?
For most landscape work, start with a Yellow-Orange 16. It darkens blue skies, enhances cloud contrast, and cuts through haze while keeping the result natural. If you want more drama, step up to a Red 25. For foliage-heavy scenes, a Green 58 will separate different greens and give vegetation a natural brightness.
Do I need a filter for black and white film?
You do not strictly need one, but a filter gives you control over contrast that you cannot get any other way on film. Without a filter, blue skies often render as pale grey and clouds disappear. Even a basic Yellow 8 corrects this and makes a visible difference in nearly every outdoor shot.
What is the difference between yellow, orange, and red filters for B&W?
They form a progression. Yellow slightly darkens skies and adds gentle contrast. Orange darkens skies more noticeably and cuts through haze. Red turns skies near-black and creates extreme contrast. Each step up blocks more blue and green light, producing a stronger effect at the cost of more exposure compensation.
How do colour filters affect exposure?
All colour filters block some light, so you need to compensate with extra exposure. Yellow filters typically need about 1 stop, orange about 2 stops, red about 3 stops, and green about 2 stops. If your camera meters through the lens, it compensates automatically. Handheld meter users need to add the stops manually.
Can I use colour filters with a digital camera for black and white?
Yes. You can place a physical filter on the lens and convert to B&W, or simulate the effect in post-processing by adjusting colour channels during B&W conversion. Physical filters give you the same real-world results as film. Simulating in post gives you more flexibility but loses the commitment and discipline of shooting with a filter.
What does a green filter do in black and white photography?
A green filter lightens foliage, grass, and trees while darkening anything red or warm-toned. It is the opposite of a red filter. Use it when vegetation is the main subject and you want greens to render as bright, separated tones instead of dark, muddy grey.